Creating a MySQL Database in RONIN
Databases are not necessarily part of a researcher's daily toolkit, although they are an important part of websites, data management systems, and popular repositories of data that researchers access.
Databases are not necessarily part of a researcher's daily toolkit, although they are an important part of websites, data management systems, and popular repositories of data that researchers access. Databases store data in a structured format (like many comma-separated value tables that are all linked together).
Many research data sets are natural fits to this format; for example, suppose you are setting up a longitudinal study to examine the relationship between gait and memory where research subjects come in on three occasions. Each occasion, they complete a questionnaire about the medications they are taking, take a physical test to measure aspects of their gait under different conditions, and then take a cognitive test to measure working memory function. For each occasion you store the questionnaire data and cognitive test data for all participants in separate files, where the first column is the subject ID. You have another file with demographic information about each subject, such as their age and sex. The gait lab periodically sends you updated spreadsheets with the gait variables they have computed. If you want to pull together a data set with all the variables across all the timepoints, you have a terrible cut and paste adventure in front of you with Excel, and even a somewhat rough time in R or Python, because people drop out and you have to make sure not to lose them and without fail, the research assistant in the gait lab makes typos in the 6 digit subject ids. I've seen mistakes in the merging here cause postdocs to suffer complete mental breakdowns.
Databases store this kind of data so that you can quickly query the contents to correctly combine data sets such as these, using Structured Query Language (SQL, pronounced "sequel"). MySQL is one of the more popular open source databases, and it is the workhorse behind services you may use daily, such as ENSEMBL and RedCAP.
This blog post will walk you through the steps necessary to create a MySQL database and to connect to it. What, you have a different idea of fun that involves binge-watching Emily in Paris on Netflix, or just going right to poking your eyes out? I assure you that the time can be well spent. You may want to do this just to learn SQL to nail your interview questions for your first data science job, to analyze a large database that you have downloaded from the web, or simply avoid your own mental breakdown.
There are basically two steps to using a database. First, you create the MySQL database on a machine. Then, you connect to this database (here we will use a friendly graphical tool called MySQLWorkbench). Normally, the machines that run MySQL and MySQLWorkbench will be different (so that database performance is not affected by other things you may do), so we will illustrate that here. However, if you are just testing things out or doing some basic analysis, you do not need to start two machines.
You can create and configure a MySQL server following the steps below and make it available to all of your users via the RONIN Service Catalogue!
Step 1. Installing MySQL on the Database Server
Create an Ubuntu 20.04 machine to run MySQL. It should have a large enough root drive to store the data that you intend to analyze. Remember that with RONIN it is always easy to change your instance type later; you can start with a small general purpose instance for now. Using RONIN Link or ssh open a bash shell to your machine.
Install MySQL using the APT package manager (everything you need to do will be as root, so sudo first).
sudo /bin/bash
apt update
apt install -y mysql-server
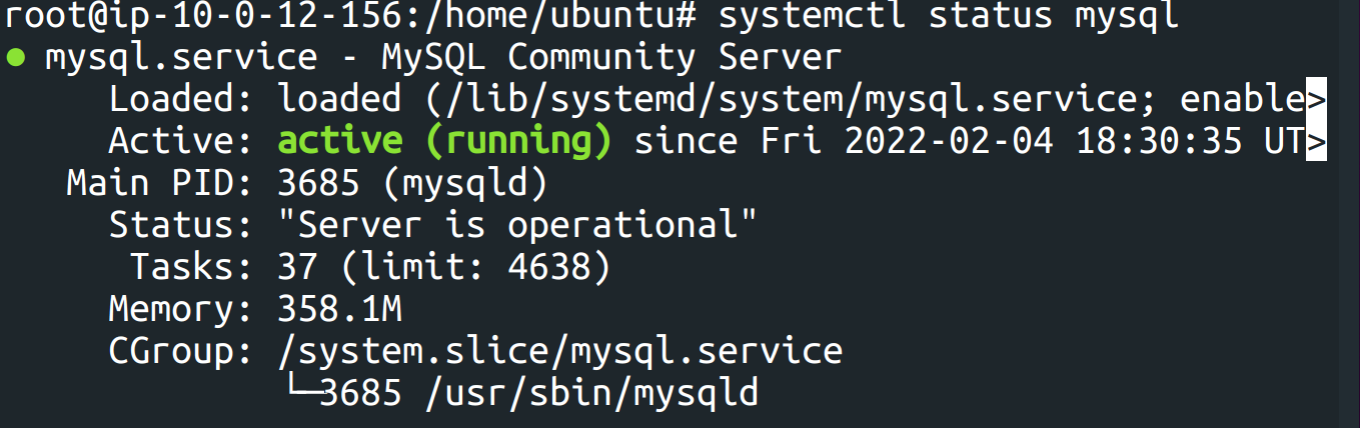
This will kick off a daemon, a process that runs in the background to listen for you to connect to it. Make sure this is running:
systemctl status mysql
You should see something that indicates mysql is running, as below. (Type q to exit this screen.)
Now configure a root password. Connect to the database locally.
mysql
This will launch the MySQL monitor, with much fanfare, and give you a prompt with which you can talk to the database ( mysql>). Now you will enter SQL commands to change the password. Replace the text below that reads "your_password_here" with a password of your choosing.
ALTER USER 'root'@'localhost' IDENTIFIED WITH
mysql_native_password BY 'your_password_here';
FLUSH PRIVILEGES;
QUIT;
Step 2. Load Up Some Data
The next step is to set up a database, hopefully with some data in it. Public datasets that are well suited to a relational data structure often release the data as both a set of files in CSV format and as SQL commands to read in the data. For example, the O*NET database, which has exhaustive information about occupations in the United States, has a MySQL version for download.
Here we look at the MySQL tutorial data set, which is a typical customer data set for a model car retailer. At the bash shell, download it to your database server and unzip it.
wget https://www.mysqltutorial.org/wp-content/uploads/2018/03/mysqlsampledatabase.zip
unzip mysqlsampledatabase.zip
Now (still as root) start up mysql so that you get the mysql> prompt. However, we set a password above that we will need to specify. The -p flag will prompt you for it.
mysql -pAt the mysql> prompt, load up the data by typing
SOURCE mysqlsampledatabase.sql
SHOW DATABASES;
QUIT;
Step 3. Install MySQL-Workbench On A Different Machine
Now that your database is running on a RONIN machine, you can connect to it from somewhere else (even your desktop) using the RONIN ssh key that you use to log in to the machine. Here we describe configuring MySQL-Workbench on a second Ubuntu machine that you create in RONIN.
Create a second Ubuntu 20.04 machine to run MySQL. We will use a remote desktop to connect to this second machine, so we recommend using a c5.large instance for better interactive performance. Follow the instructions in our blog post to bring up a remote desktop to this machine, and then open a terminal in the desktop.
We will install MySQL Workbench as follows.
wget https://dev.mysql.com/get/Downloads/MySQLGUITools/mysql-workbench-community_8.0.28-1ubuntu20.04_amd64.deb
sudo dpkg -i  mysql-workbench-community_8.0.28-1ubuntu20.04_amd64.deb

# Install missing packages
sudo apt -y --fix-broken install

# Tell mysql-workbench where to find this librarys
export PROJSO=/lib/x86_64-linux-gnu/libproj.so.15
Now launch mysql-workbench, which will bring up a graphical interface that we configure to access the database.
mysql-workbench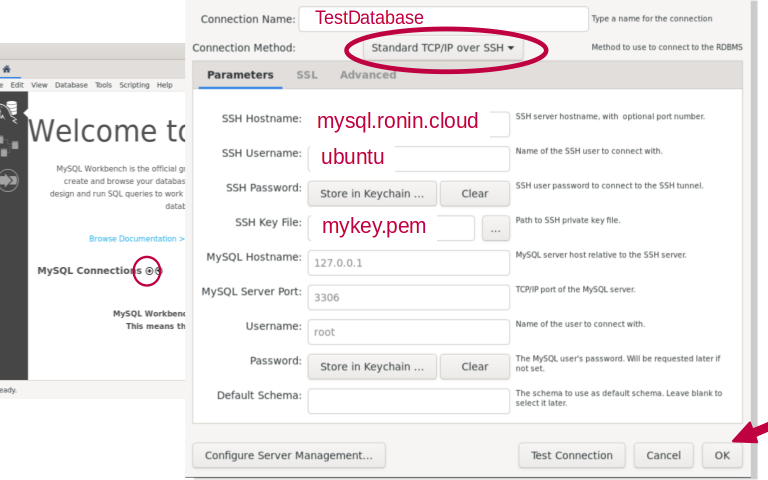
This will bring up a Welcome screen; click on the tiny plus sign next to "MySQL Connections" (circled above) to configure our connection to the database. This will bring up the Connection Panel as shown in Figure 1.
Because RONIN permits connections only through SSH, we will select as our connection method "Standard TCP/IP over SSH". This means that we can connect to the database just like we would connect to a RONIN machine, using an SSH key.
You can give the connection any Connection Name you choose; here we are calling it "TestDatabase". For SSH Hostname, enter the name of the machine that is running the database, that you created in Step 1. For SSH Username, enter the username that you would use to log in to that machine. Because we created an Ubuntu machine, the username is ubuntu.
Finally, you will need that SSH key file. If you do not have it on your current RONIN machine, you will need to locate it on your laptop (look in your Downloads folder) and copy it to your second Ubuntu machine. For quick reference, assuming you have used the same key for both machines, and it is called key.pem, to copy it from your laptop to your MySQL-Workbench machine, you would type something like:
scp -i key.pem key.pem ubuntu@mysqlworkbench.ronin.cloud:key.pem
Replace mysqlworkbench.ronin.cloud with the actual name of your machine. This will use the key for permission to copy the key. Then you can select it to configure the database.
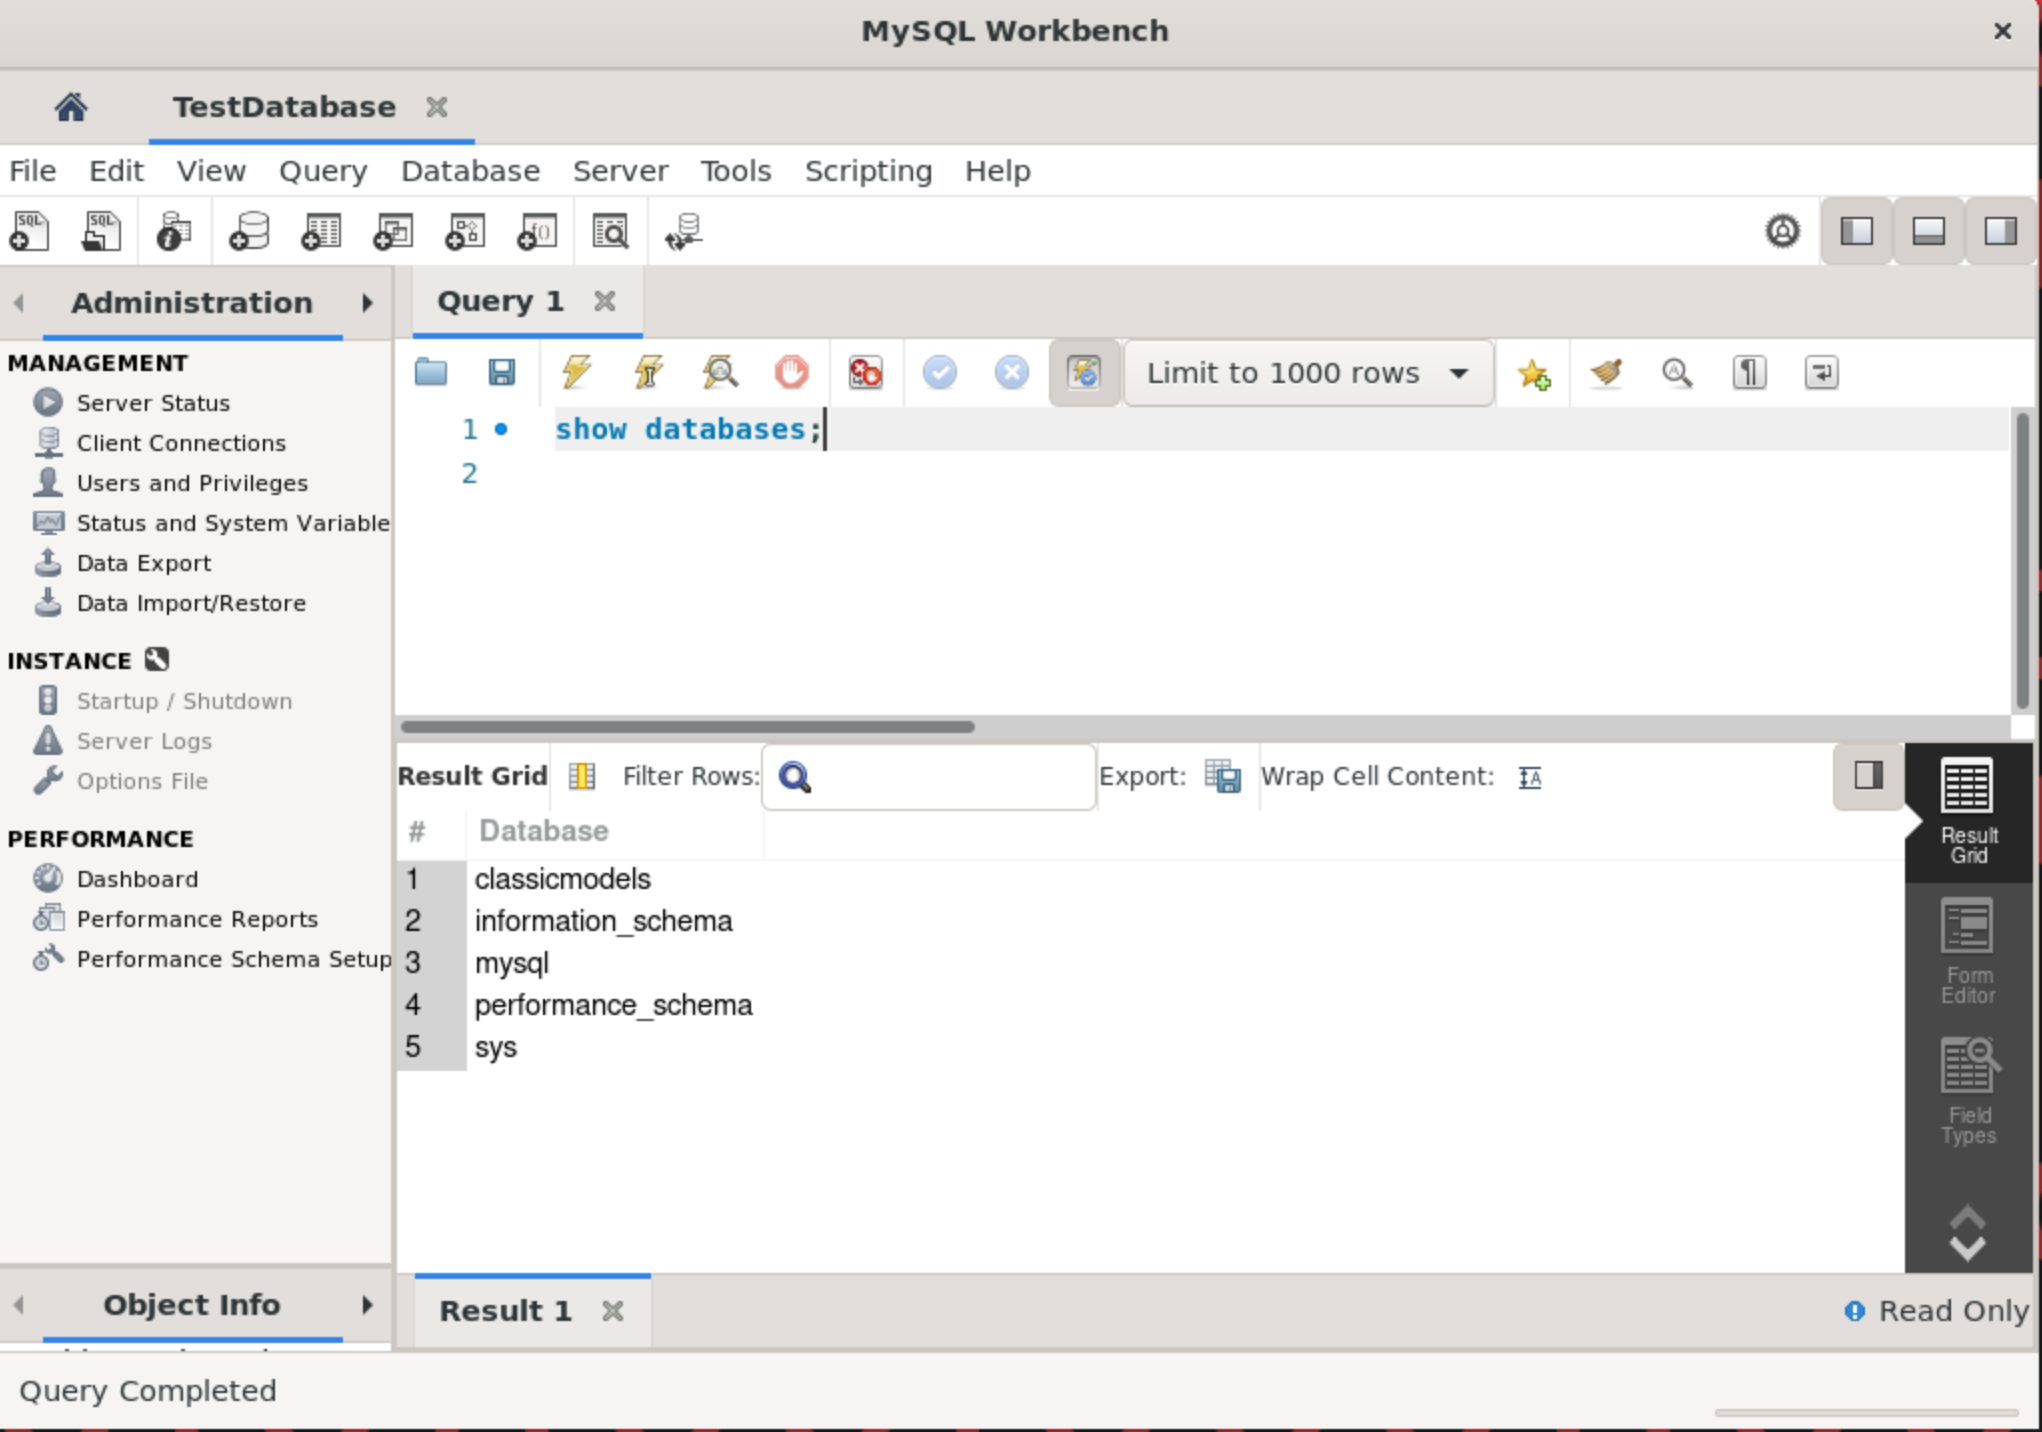
Everything else can stay with the default settings. Click on "OK", and you're off! You will see the connected database appear in the window, and when you click on it, you will have to type the password you configured in Step 1. Then you will be able to type in queries to access the database, just as we did in Step 2, but from a remote machine and with a graphical user interface!
When To Move To a Dedicated Database Service
Databases are serious stuff, and there is a big difference between creating a database to manipulate research data for a lab and storing financial data for a global bank, or even operating a university-wide data repository. When the stakes are high, you want to make really sure that you replicate the database so that you can always get to it and that you back it up automatically so you never lose even one transaction. Native cloud services (such as Amazon Relational Database Service) help with scaling up your database and managing the operating system and software. However, if the data you are working with are already a replica of data that is also stored elsewhere and some downtime (for the database, not you) would not be the end of your career, you can save some money and manage the database yourself. RONIN ensures that the database cannot be accessed without that SSH key (which you can delete at a moment's notice), so it is well secured. You can leverage RONIN features such as Smart Schedule to turn it off when you aren't using it, and Backups to back it up when you need to. No matter what method you choose, you will always need to make sure your database has enough memory and CPU power to handle incoming requests, and in RONIN you can monitor that with Netdata.
What Next?
If you already know all about databases, you are now ready to go forth and query! If you are new to the concept, we suggest working through a tutorial. Either way, MySQL is an important tool for data management that can be the foundation of excellent lab data hygiene and a grant-worthy data sharing plan.